TL;DR Here at test.local we finally got a proper rack and additional servers. The first project with the new server was fine tuning our process for automating deployment of VMs in Hyper-V. The function is here.
Welcome to Part XVI of our Back to the Basics Series!
Part I: NTDS.dit vs SAM
Part II: Ownership Matters
Part III: Recovering from a Crash
Part IV: Setting up a Simple Honeypot Account
Part V: Automating DC Deployment
Part VI: Sometimes it’s the dumbest thing
Part VII: Merry Christmas, macros, & Base64
Part VIII: Why old 0 Days make great teaching tools
Part IX: PowerShell & PS1s without PowerShell.exe
Part X: Ownership & so called “effective permissions”
Part XI: Windows Event Forwarding & SACLs
Part XII: Poorly planned honeypots & other Bad Ideas
Part XIII: Setting up a simple honey token
Part XIV: Smartcards and Pass-the-Hash
Part XV: Forwarding logs to Sentinel & basic alerts
Part XVI: Automating VM deployments in Hyper-V
Part XVII: Migrating the lab from ESXi to Hyper-V
Part XVIII: Centrally managing Hyper-V & Live Migrations
Part XIX: DACL Primer
Background
Test.local was originally created on our gaming desktop by putting the free version of ESXi in the free VMware player and giving it 36 GB of RAM and 1 TB of HD. This worked well enough at first for running a few DCs, member serves, and a Windows 10 client or two while studying for a Microsoft exam. It quickly began to get tiresome though, particularly because the underlying host OS had to reboot every so often to install updates.
We then sprang for a refurbished HP ProLiant DL360 G8 server for $220, added a 1 TB SSD, and replaced a fan. This server was up and running with the wind for only about $300 total using what was at the time the free version of ESXi.
Broadcom enters the picture
As most home labbers know Broadcom bought out VMware in Nov 2023. This company seems to be more money hungry and quite frankly stupid than VMware was. They have announced that they are discontinuing the free version of ESXi as of 13 Feb 2024.
We kinda expected this. The homelab subreddit has been discussing it ever since Broadcom came in. Apparently this company already had a poor reputation.
Here at test.local we were already looking to migrate to Microsoft Hyper-V or Proxmox as the free version of ESXi did not include PowerCLI. The lack of ability to automate VM deployment in ESXi via PowerCLI was already beginning to cramp our style.
I mean, clicking a bunch of buttons in the GUI instead of just running a function in PowerShell is a real buzzkill, especially when you’re trying to scale the thing.

Our new server
We recently sprang for a second refurbished server, a rack, and a cheap UPS/glorified surge protector.

The nice thing is that everything in that picture, including the first refurbished server we got back in 2022, is only about $1,000 total. Home labbing is a rather cheap hobby compared to many others. Another nice thing is that this second HP server has 192 GB of RAM whereas the first one has 96 GB.
Both are running on 1 TB SSDs for now. In the second server’s case this is a Vulan SSC, which incidentally is the same model we got for Tiny Human’s Tiny Desktop. This only matters because older HP servers seem to be rather picky about what brand of hardware you stick in them. Shove the “wrong” brand in there and the temperature sensor goes all screwy, thinks the server is overheating, and kicks the fans up to 90% + speed … which makes your wife think a jet is taking off in your storage room. Just FYSA.
(That small switch has since been replaced, before anyone asks.)
Getting the server up and running
I initially downloaded the free Hyper-V Server from Microsoft, burned it to DVD-R, and installed it. However I still lean on RDP and PSSession pretty heavily, so I wasn’t quite ready for a truly headless server.
Hence I put Windows Server 2019 on the physical server and enabled Hyper-V. I might put Hyper-V server on the initial HP server once I get the entire lab migrated over. The idea is to spin up VMs on Hyper-V running on Windows Server, then migrate them over to the other server running Hyper-V Server on bare metal. That’s a project for a future post though.
For now I used the following process to install Windows Server 2019 from a USB drive:
First create a bootable USB HD from a Windows Server 2019 ISO as shown here:
#https://petri.com/create-a-bootable-usb-drive-for-windows-server-2019-installation/

$isopath = ".\Downloads\Windows_Server_2019_Datacenter_EVAL_en-us.iso"
Get-Disk | Where-Object BusType -eq USB | Format-Table -AutoSize
$usb = Get-Disk | Where-Object Number -eq 1
$usb | Clear-Disk -RemoveData
$usb | Set-Disk -PartitionStyle MBR
$volume = $usb | New-Partition -UseMaximumSize -AssignDriveLetter

#ISO part
$mount = Mount-DiskImage -ImagePath $isopath -StorageType ISO
$drive = ($mount | Get-Volume).DriveLetter

#Copy-Item -Path ($drive +":\*") -Destination ($volume.DriveLetter + ":\") -Recurse
Copy-Item -Path ($drive +":\*") -Destination ("D:\") -Recurse

#Check the mount path and adjust, in my case it was E
dism /Split-Image /ImageFile:E:\sources\install.wim /SWMFile:.\Downloads\install.swm /FileSize:4096
Copy-Item -Path .\Downloads\install.swm -Destination ("D:\sources\install.swm")
Copy-Item -Path .\Downloads\install2.swm -Destination ("D:\sources\install2.swm")

Dismount-DiskImage -ImagePath $isopath
— — If/when we hit an issue during the install — -
Follow the steps shown here to manually create a partition to install to:
Shift + F10

diskpart
list disk
select disk 0
clean

#just make sure this is enough to hold the ISO
create partition primary size=15000
format fs=ntfs quick
assign
active
list volume

#see what the USB drive is called, mine was D:\
exit
cd d:
xcopy d: c:/e/h/k
Restart the install and you should now see 2 partitions.
The files will be on the one marked System.
Select the second, larger partition and Install Windows.
Once Windows installs run cmd.exe as Admin:
bcdeditOne should be marked “Windows Boot Loader” with description “Windows Setup”.
Copy/paste the identifier value and:
#include the {} brackets around the value
bcdedit /delete <value>
Setting up Hyper-V
I leaned pretty heavily on our Hypver-V howto from 2022 initially, but I quickly began to refine our process further.
#Setup Hyper-V and a SW
Install-WindowsFeature -Name "Hyper-V" –IncludeAllSubFeature
New-VMSwitch -Name "Testing" -NetAdapterName "Ethernet"
Set-VMSwitch -Name Testing -AllowManagementOS $true

#Create a share drive on the Hyper-V server to host VM configs, ISOs, answer files, etc
New-Item -ItemType Directory "C:\VM_Stuff_Share"
New-SmbShare -Path "C:\VM_Stuff_Share" -Name "VM_Stuff" -FullAccess "test\Domain Admins"
Grant-SmbShareAccess -Name "VM_Stuff" -AccountName "test\Domain Admins" -AccessRight Full
#On systems that will use this drive
New-PSDrive -Name "S" -Root "\\ServerII\VM_Stuff" -Persist -PSProvider "FileSystem"Automating VM deployment
Now we get to the good part, automating creating & configuring VMs.
The function is on our GitHub here .
- Create-VM.ps1 has the functions outlined below.
- VMConfig.ps1 contains the NIC config for new VMs, just change the IP variable in there for each VM.
- Cleanup.ps1 stops the VM named “TestServer”, removes the VM & it’s disk, & deletes its AD account.
Obviously one should only run Cleanup.ps1 if they are just testing out the creation process.
This process creates, configures, and joins VMs to test.local. All that is left after that is to configure whatever role the VM will serve in, be that Exchange, Microsoft Entra Connect [formally known as Azure AD Connect], being the Windows Event Collector, etc.
There is a really awesome website out there now that will create your answer file for you. Grab an ISO off the Microsoft Evaluation Center. The rest is on our GitHub.
We created three functions:
- The first function creates the VM from an ISO file and an answer file
- The second function disables NetBIOS & IPv6, then configures a static IP and DNS servers
- The third function names the VM as specified and joins it to the test.local domain
All one has to do is specify the VM name via a command line option in all three functions and set the desired IP for the VM in VMConfig.ps1.
If you lab environment uses DCHP then just don’t run the second function. Naturally change the third function to specify your lab’s FQDN.
Here at test.local we have taken the lazy approach so far and simply statically assigned IPs to our VMs. This allows us to put everything in bridge mode and simply use the IPs above .100 that the home RTR doesn’t assign. We then simply manage them remotely from our laptop while sitting on the living room couch.
This approach so far has only limited things in RE to SSPR in hybrid AD, as the ‘on prem’ AD is NATed. This has not limited Microsoft Entra Connect, Cloud Sync, Azure Arc, or forwarding logs to Azure Sentinel however. We have been able to get away without paying for a domain name so far by utilizing alternate UPNs in AD.
Running the thing
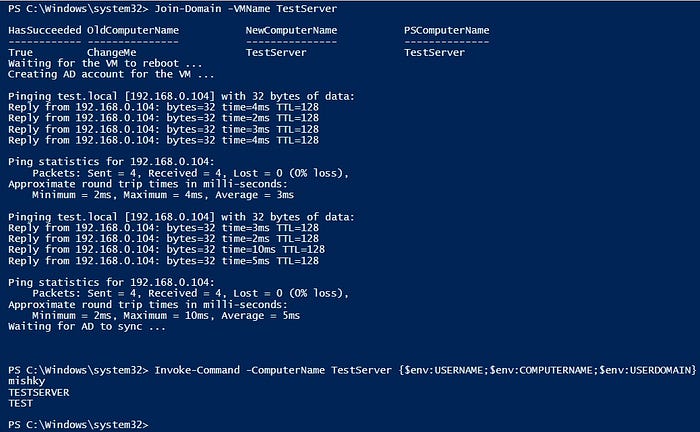
So without further ado, let’s show an example. We will create a VM named TestServer with IP 192.168.0.108 and join it to the domain. To do this we simply
Set the $IP = “192.168.0.108” in VMConfig.ps1 to the IP you want for the VM then:
Run Create-VM.ps1.
Create-VM -VMName TestServer
Config-VM -VMName TestServer
Join-Domain -VMName TestServer
Again, if your domain uses DHCP then simply leave out the second function ‘Config-VM’ and tweak the ‘Join-Domain’ function for your domain name and user account who can add domain computers.
Summary
That’s it. The above automates creating a domain VM running Windows Server 2019. You just have to get your own ISO from the Microsoft Emulation Center, the rest is on our GitHub.
Group Policy takes over once the VM is domain joined and configures it the rest of the way. We set its role with RDP, PSSession, etc. We have already gone over this in previous howtos though.
Within the first hour of firing up Hyper-V we were remotely managing it and automating deployment of VMs. We were never able to do this in VMware since PowerCLI was not included in the free version of ESXi, and now ESXi is no longer free anyway.
Needless to say if a boss ever asks me in the future what hypervisor the organization should use then I will NOT recommend VMware.
Congrats Broadcom, I guess? You managed to trash whatever reputation VMware had built up over the previous years and decades in a matter of just a few months.
Future lab projects are procuring another server to run Proxmox and moving the initial server over from the formally free version of ESXi to Hyper-V Server, then working on the process of migrating VMs between multiple Hyper-V servers.
Well those are future projects for future posts.
References
End of availability for the free ESXi: https://kb.vmware.com/s/article/2107518
Convert-WindowsImage: https://github.com/x0nn/Convert-WindowsImage/blob/main/README.md
Answer file: https://www.windowsafg.com/server2019.html
PowerShell Direct: https://learn.microsoft.com/en-us/virtualization/hyper-v-on-windows/user-guide/powershell-direct
Clear vars from a PS session: https://pscustomobject.github.io/powershell/howto/PowerShell-ISE-Clear-Variables/
make PC discoverable via PS: https://www.majorgeeks.com/content/page/how_to_turn_on_or_off_network_discovery.html
